LiveKit docs › Get Started › Agent Embed Widget
---
# Agent Embed Widget
> Embed a LiveKit Cloud agent on any website with a script tag.
## Overview
The Agent Embed Widget adds a LiveKit Cloud agent to any website without building a frontend. Paste a script tag into your page, and your users see a launcher button in the bottom-right corner. Clicking it opens a pop-up where they talk to your agent.
The same agent can run on multiple sites with different branding, and you can pass per-user data through the snippet to personalize each session.
If your agent isn't on LiveKit Cloud, or you need full control over the frontend, use the open-source [Web embed starter app](https://docs.livekit.io/frontends/start/starter-apps/web-embed.md) instead.
## Adding the widget
Configure and enable the widget from the agent's page in the LiveKit Cloud dashboard. You need the **Write** role on the project to enable, configure, or disable the widget.
The following steps add a widget and generate a snippet you can embed on your site:
1. In the [Agents dashboard](https://cloud.livekit.io/projects/p_/agents), open the agent you want to embed.
2. Click **Embed**.
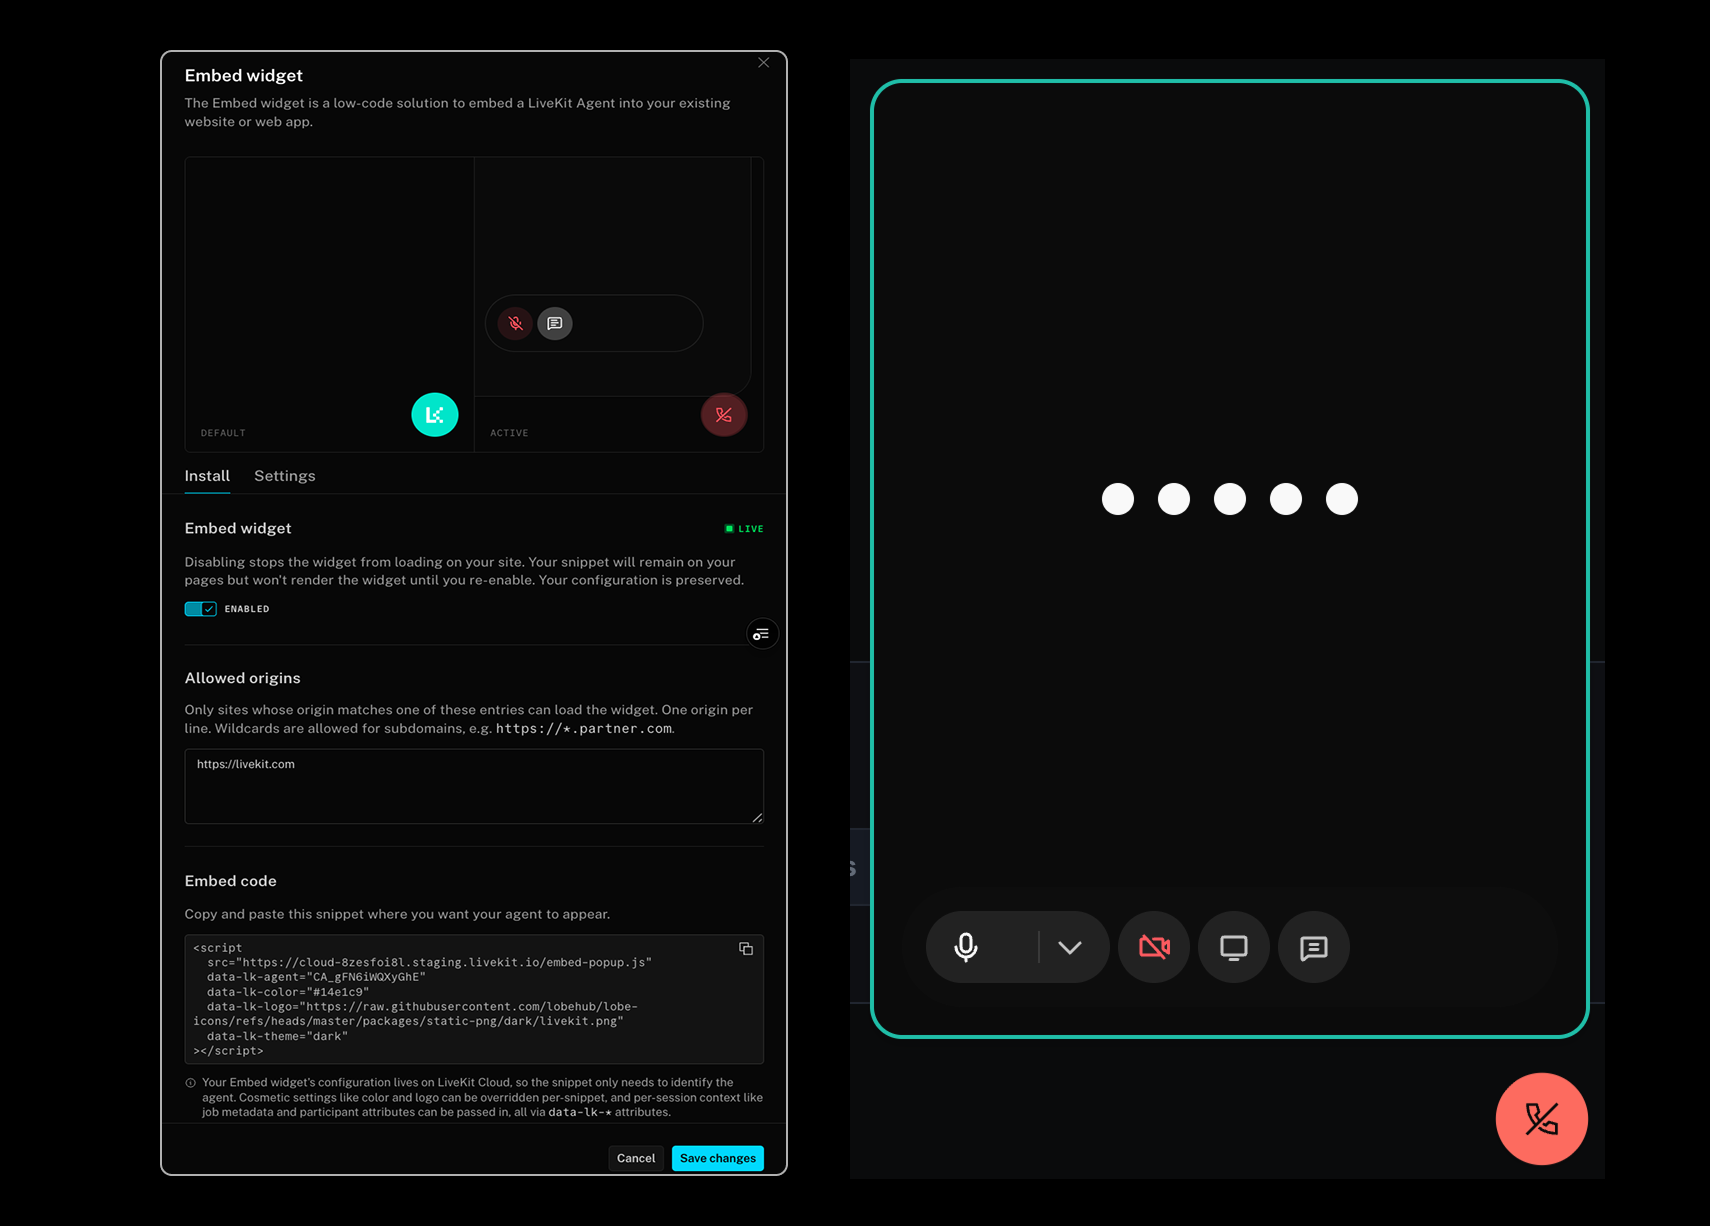
3. On the **Install** tab, add an entry to **Allowed origins** for each site where you want to install the widget.
4. On the **Settings** tab, configure the theme, button color, icon, and enabled capabilities.
5. Return to the **Install** tab, toggle **Embed widget** on, and click **Save changes**. The widget doesn't take effect until you save. You can toggle it off later from the same place without changing your snippets.
6. Copy the generated `
```
> ℹ️ **Note**
>
> The widget bundle must load as a classic `
```
To pass context about the signed-in user to the agent, inject per-user attributes from your backend or templating engine when rendering the page:
```html
```
### All attributes
You can use the following attributes in the snippet to customize the widget:
- **`data-lk-color`** _(string)_ (optional): Button color for the launcher and pop-up. Must be hex (`#RRGGBB`), for example `#0a84ff`.
- **`data-lk-logo`** _(string)_ (optional): URL of the launcher icon image. Must be `https://`. Set in the dashboard as **Icon URL**.
- **`data-lk-theme`** _(string)_ (optional): Visual theme. One of `light`, `dark`, or `system`. `system` follows the user's OS or browser preference and updates when the OS theme changes.
- **`data-lk-identity`** _(string)_ (optional): Participant identity for the user. If omitted, the widget generates a random identity per session.
- **`data-lk-name`** _(string)_ (optional): Display name for the user.
- **`data-lk-metadata`** _(string)_ (optional): Free-text participant metadata. Available inside the agent as [participant metadata](https://docs.livekit.io/transport/data/state/participant-attributes.md).
- **`data-lk-job-metadata`** _(string)_ (optional): JSON-encoded job metadata passed to the agent on dispatch. Read it inside your agent from [job metadata](https://docs.livekit.io/agents/server/job.md#metadata) or as [variables](https://docs.livekit.io/agents/start/builder.md#variables) in an Agent Builder agent.
- **`data-lk-attrs`** _(string)_ (optional): Participant attributes as a JSON object string. Available inside the agent as [participant attributes](https://docs.livekit.io/transport/data/state/participant-attributes.md).
## Limitations
- Only LiveKit Cloud agents are supported.
- The snippet can't override the capabilities you set in the dashboard, the room name, or how the agent is dispatched.
- Only one widget can mount per page.
Use the [Web embed starter app](https://docs.livekit.io/frontends/start/starter-apps/web-embed.md) when you need to work around any of these.
## Additional resources
- **[Agents dashboard](https://cloud.livekit.io/projects/p_/agents)**: Manage and deploy your LiveKit Cloud agents.
- **[Web embed starter app](https://docs.livekit.io/frontends/start/starter-apps/web-embed.md)**: Self-hosted embeddable widget with full frontend control.
---
This document was rendered at 2026-06-07T11:32:48.301Z.
For the latest version of this document, see [https://docs.livekit.io/agents/start/embed.md](https://docs.livekit.io/agents/start/embed.md).
To explore all LiveKit documentation, see [llms.txt](https://docs.livekit.io/llms.txt).