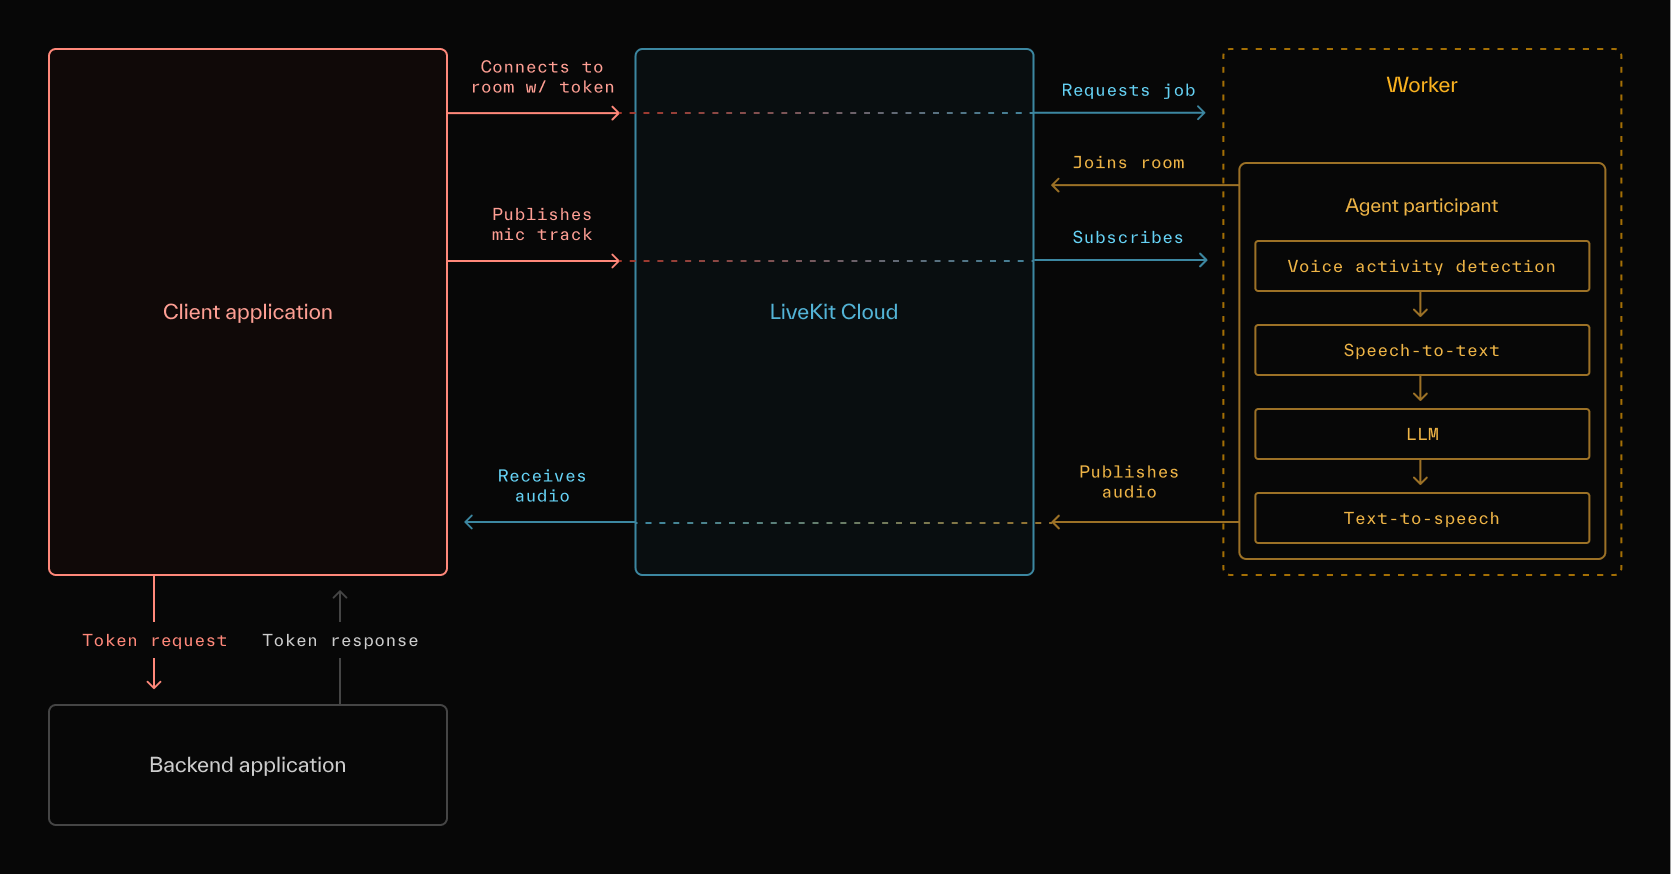
This quickstart tutorial walks you through the steps to build a conversational AI application using Python and NextJS. It uses LiveKit's Agents SDK and React Components Library to create an AI-powered voice assistant that can engage in realtime conversations with users. By the end, you will have a basic conversational AI application that you can run and interact with.

Prerequisites
- LiveKit Cloud Project or open-source LiveKit server
- ElevenLabs API Key
- Deepgram API Key
- OpenAI API Key
- Python 3.10+
Steps
1. Set up your environment
Set the following environment variables:
export LIVEKIT_URL=<your LiveKit server URL>export LIVEKIT_API_KEY=<your API Key>export LIVEKIT_API_SECRET=<your API Secret>export ELEVEN_API_KEY=<your ElevenLabs API key>export DEEPGRAM_API_KEY=<your Deepgram API key>export OPENAI_API_KEY=<your OpenAI API key>
Set up a Python virtual environment:
python -m venv venvsource venv/bin/activate
Install the necessary Python packages:
pip install \livekit \livekit-agents \livekit-plugins-deepgram \livekit-plugins-openai \livekit-plugins-elevenlabs \livekit-plugins-silero
2. Create the server agent
Create a file named main.py and add the following code:
import asynciofrom livekit.agents import JobContext, WorkerOptions, clifrom livekit.agents.llm import ChatContextfrom livekit.agents.voice_assistant import VoiceAssistantfrom livekit.plugins import deepgram, openai, silero# This function is the entrypoint for the agent.async def entrypoint(ctx: JobContext):# Create an initial chat context with a system promptinitial_ctx = ChatContext().append(role="system",text=("You are a voice assistant created by LiveKit. Your interface with users will be voice. ""You should use short and concise responses, and avoiding usage of unpronouncable punctuation."),)# Connect to the LiveKit roomawait ctx.connect()# VoiceAssistant is a class that creates a full conversational AI agent.# See https://github.com/livekit/agents/blob/main/livekit-agents/livekit/agents/voice_assistant/assistant.py# for details on how it works.assistant = VoiceAssistant(vad=silero.VAD(),stt=deepgram.STT(),llm=openai.LLM(),tts=openai.TTS(),chat_ctx=initial_ctx,)# Start the voice assistant with the LiveKit roomassistant.start(ctx.room)await asyncio.sleep(1)# Greets the user with an initial messageawait assistant.say("Hey, how can I help you today?", allow_interruptions=True)if __name__ == "__main__":# Initialize the worker with the entrypointcli.run_app(WorkerOptions(entrypoint_fnc=entrypoint))
3. Run the server agent
Run the agent worker:
python main.py start
After running the above command, the worker will start listening for job requests from a LiveKit server. You can run many workers in the same way to scale your Agent and LiveKit's servers will load balance the requests between them.
4. Set up the frontend environment
In the following steps we'll cover how to build a simple frontend application to communicate with your agent. If you want to test your agent without creating a frontend application, we made Agents Playground: a one-size-fits-most frontend tool for testing agents.
By default, an agent job request is created when a Room is created. We'll create a NextJS application for the human participant to join a new Room talk to the AI agent.
Start by scaffolding a NextJS project:
npx create-next-app@latest
Install LiveKit dependencies:
npm install @livekit/components-react @livekit/components-styles livekit-client livekit-server-sdk
Set the following environment variables in your .env.local file:
export LIVEKIT_URL=<your LiveKit server URL>export LIVEKIT_API_KEY=<your API Key>export LIVEKIT_API_SECRET=<your API Secret>
5. Create an access token endpoint
Create a file src/app/api/token/route.ts and add the following code:
import { AccessToken } from 'livekit-server-sdk';export async function GET(request: Request) {const roomName = Math.random().toString(36).substring(7);const apiKey = process.env.LIVEKIT_API_KEY;const apiSecret = process.env.LIVEKIT_API_SECRET;const at = new AccessToken(apiKey, apiSecret, {identity: "human_user"});at.addGrant({room: roomName,roomJoin: true,canPublish: true,canPublishData: true,canSubscribe: true,});return Response.json({ accessToken: await at.toJwt(), url: process.env.LIVEKIT_URL });}
This sets up an API endpoint to generate LiveKit access tokens.
6. Create the UI
Create a file src/app/page.tsx and add the following code:
'use client';import {LiveKitRoom,RoomAudioRenderer,useLocalParticipant,} from '@livekit/components-react';import { useState } from "react";export default () => {const [token, setToken] = useState<string | null>(null);const [url, setUrl] = useState<string | null>(null);return (<><main>{token === null ? (<button onClick={async () => {const {accessToken, url} = await fetch('/api/token').then(res => res.json());setToken(accessToken);setUrl(url);}}>Connect</button>) : (<LiveKitRoomtoken={token}serverUrl={url}connectOptions={{autoSubscribe: true}}><ActiveRoom /></LiveKitRoom>)}</main></>);};const ActiveRoom = () => {const { localParticipant, isMicrophoneEnabled } = useLocalParticipant();return (<><RoomAudioRenderer /><button onClick={() => {localParticipant?.setMicrophoneEnabled(!isMicrophoneEnabled)}}>Toggle Microphone</button><div>Audio Enabled: { isMicrophoneEnabled ? 'Unmuted' : 'Muted' }</div></>);};
This sets up the main page component that renders the VideoConference UI.
7. Run the frontend application
In your terminal, run:
npm run dev
This starts the app on localhost:3000.
8. Talk with the AI-powered agent
Once you have the server agent and frontend application up and running, you can start talking to the agent, asking questions, or discussing any topic you'd like. When you join a room through the web UI, an agent job request is automatically sent to your worker. The worker accepts the job, and an AI-powered agent joins the room, ready to engage in conversation. The agent will listen for your voice, process your speech using Deepgram's speech-to-text (STT) technology, generate responses with OpenAI's advanced language models, and reply to you verbally using the text-to-speech (TTS) service from ElevenLabs.